HRSprout is an all-in-one HRMS software solution that offers a suite of features to help businesses manage HR needs. The software includes tools for managing employee data, tracking time and attendance, managing benefits and payroll, and creating custom reports.
This article provides an overview of how the HRSprout app works and what you need to know to get started with HRSprout.
Go to infinity.500apps.com > Select HR from the top bar > Select HRSprout
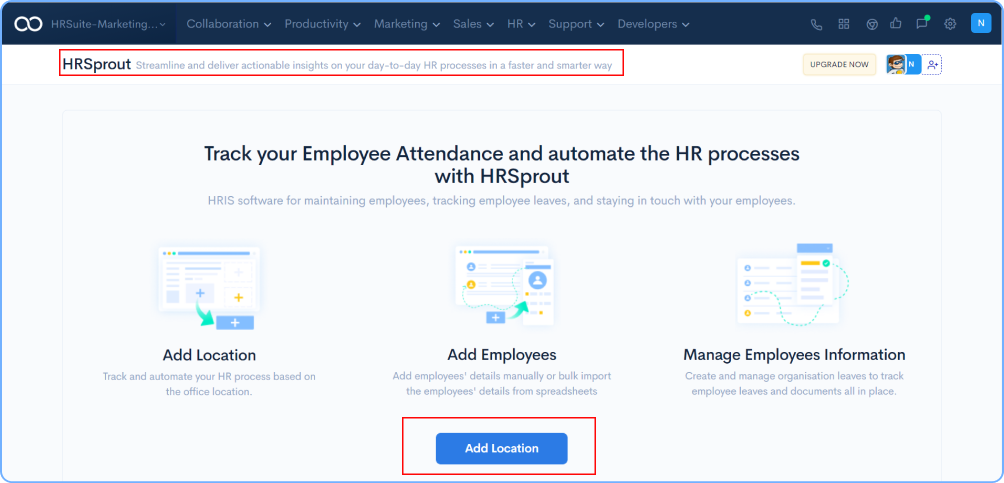
Login to the HRSprout application, click on the Add Location button.
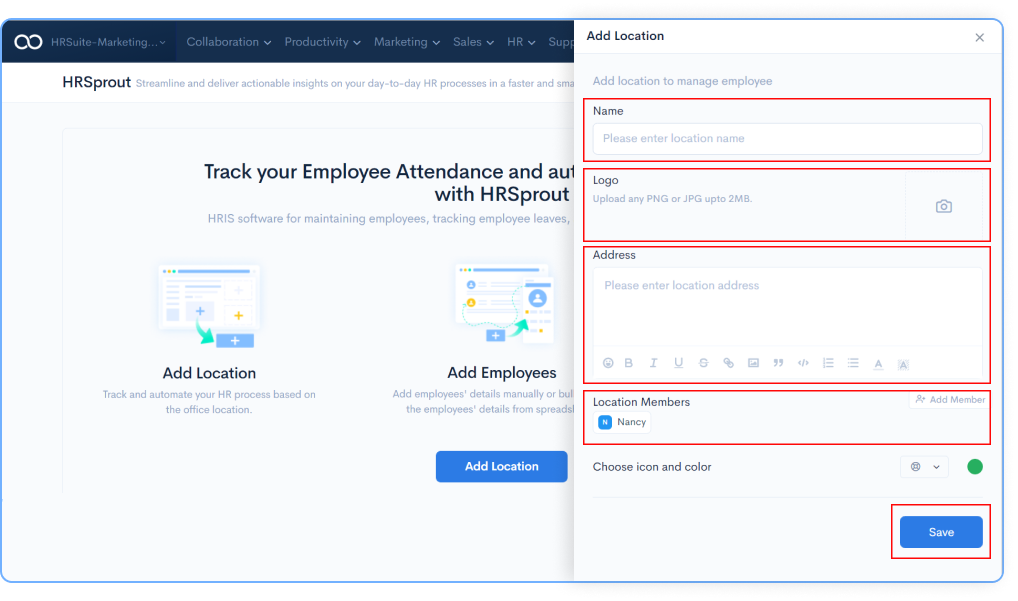
On your RHS popup, fill in the details of location, address, logo, members, and click on the Save button.
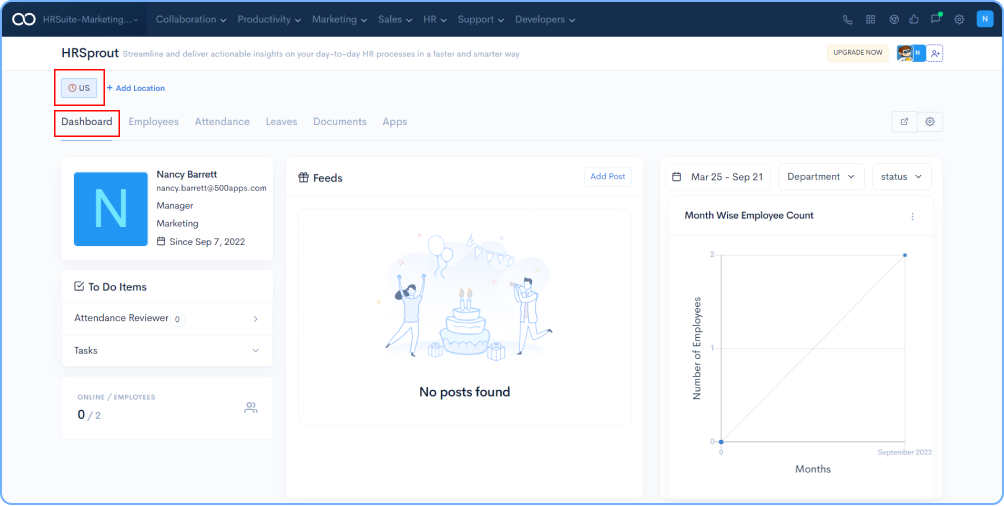
Dashboard will be created once you have entered all the required information, as mentioned above. Take a look at the dashboard.
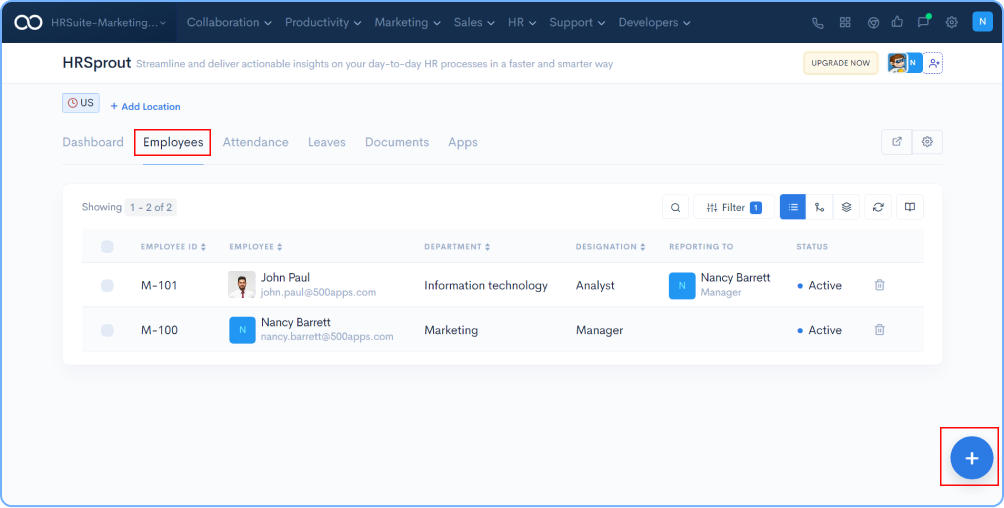
Click on Employees next to Dashboard and click on the + icon on the RHS.
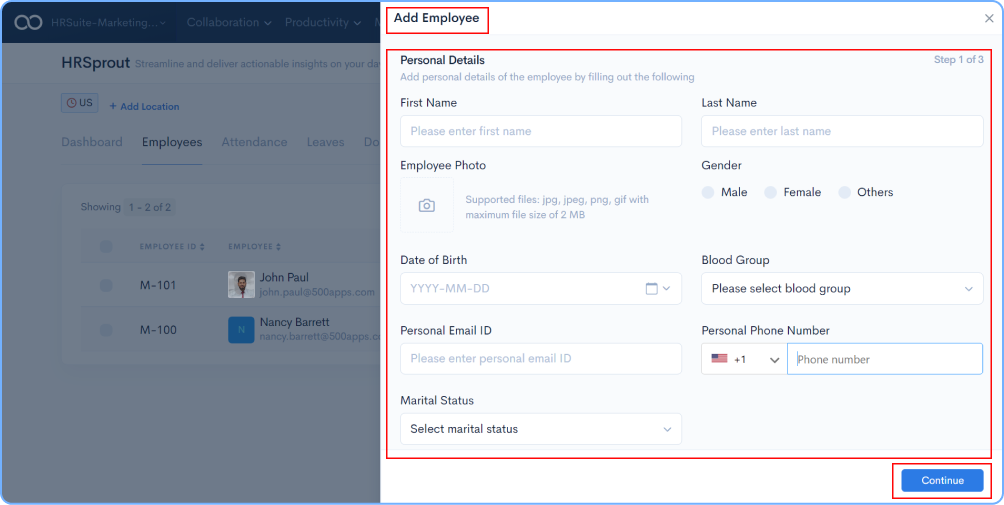
Fill the details of the employee as required in the popup on yoru RHS and click on the Continue button.
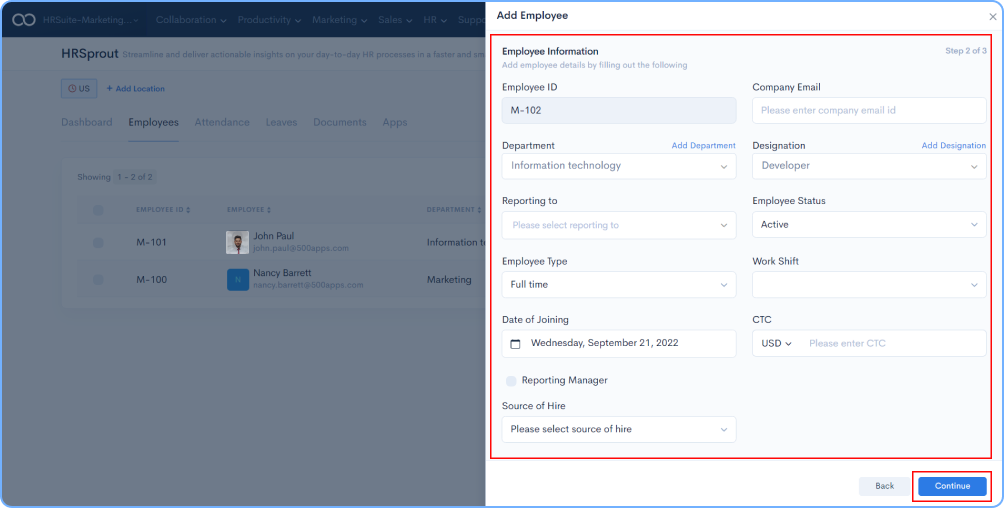
Add details organization like, employee id, reporting manager, designation of employee, department, work shift, CTC, date of joining, source of hire, employee bank details.
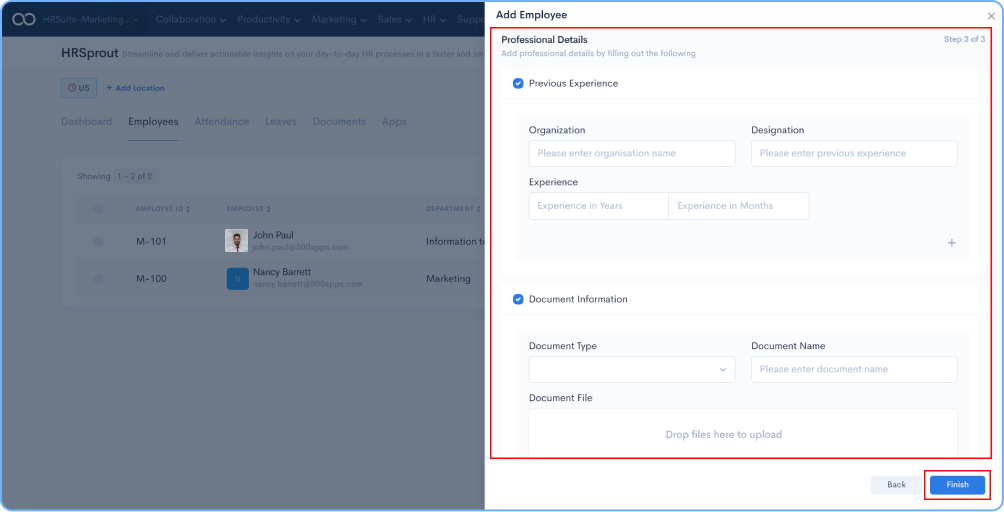
Add professional details like previous experience and document information and click on the Finish button.
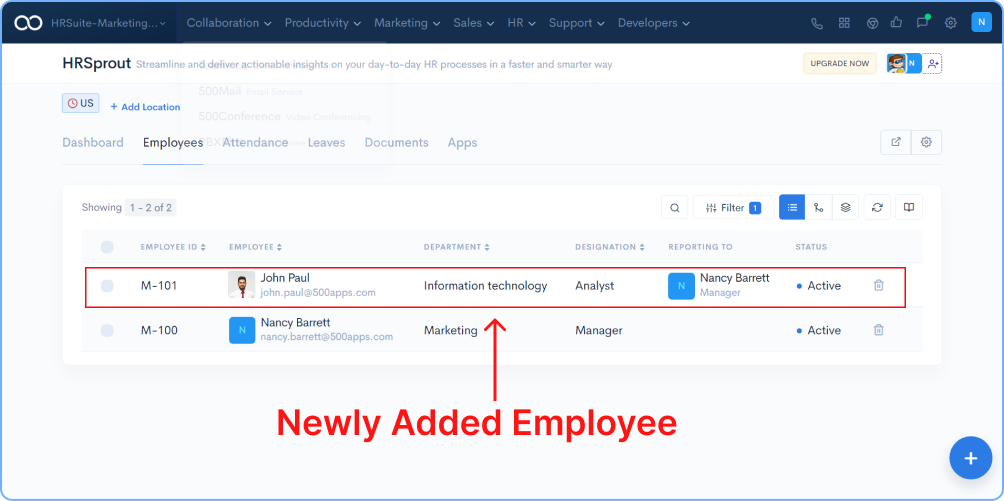
After clicking the finish button the employee will be added to the Dashboard.
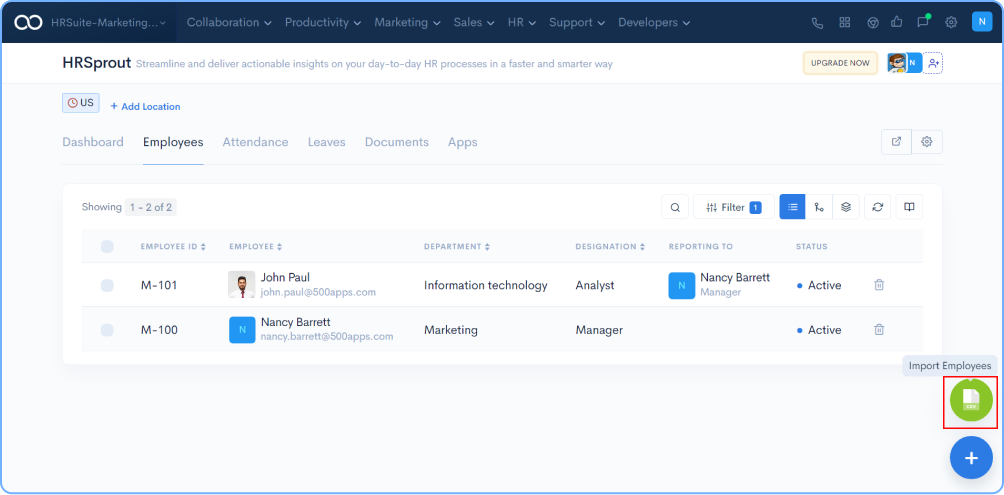
We can also bulk import employees by uploading a .csv or .xls or .xlsx format files. Hover your mouse over the + symbol you will find an option named Import Employees click on it.
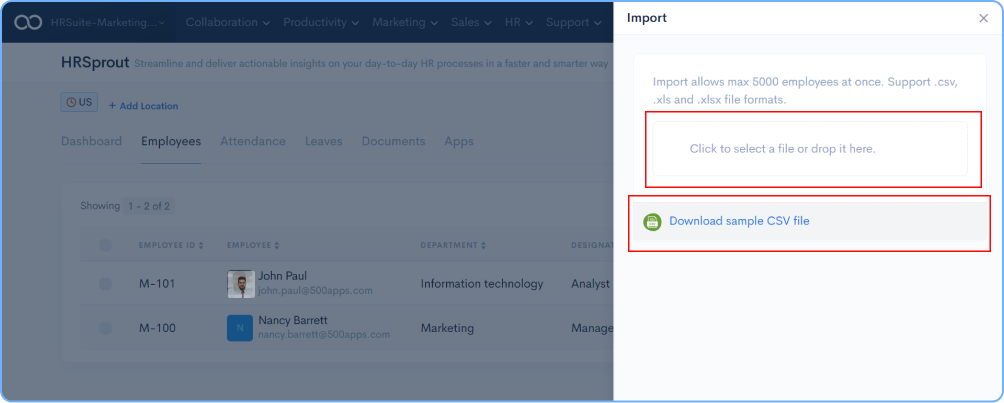
Click to select a file or drop it here from your desktop or laptop.
Note: Import allows max 5000 employees at once.Download the sample CSV file and upload the data in the similar format.
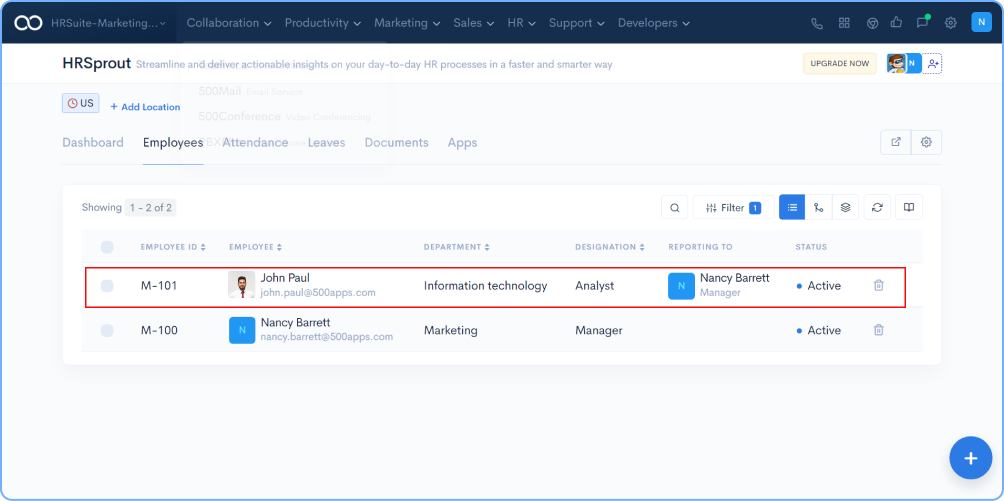
Once the employee details are imported, the dashboard will get updated with a list of employees updated through the sheet.
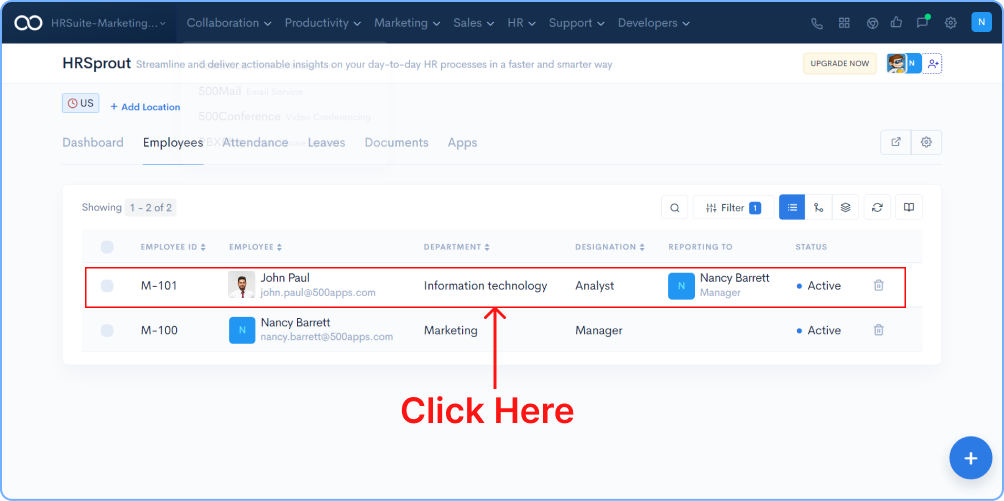
Click on the employee name, to view the employee details.
Click on the Personal Details tab to view the details on the employee.
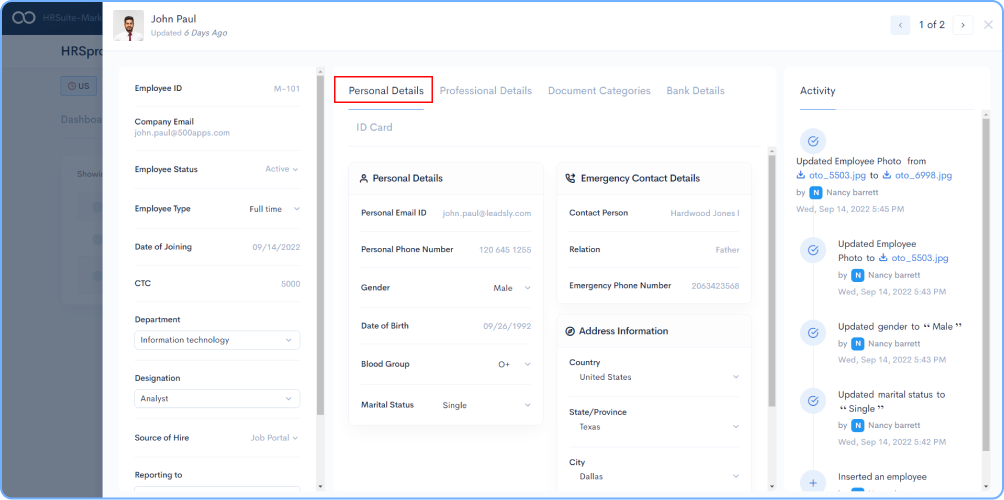
Click on the Professional Details tab to view the details on the employee.
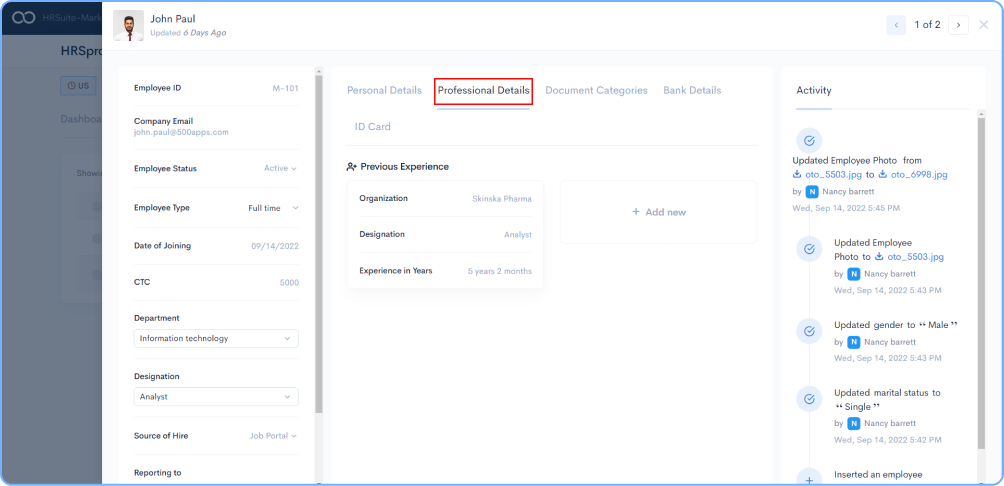
Click on the Document Categories tab to view the details on the employee.

Click on the Bank Details tab to view the details on the employee.
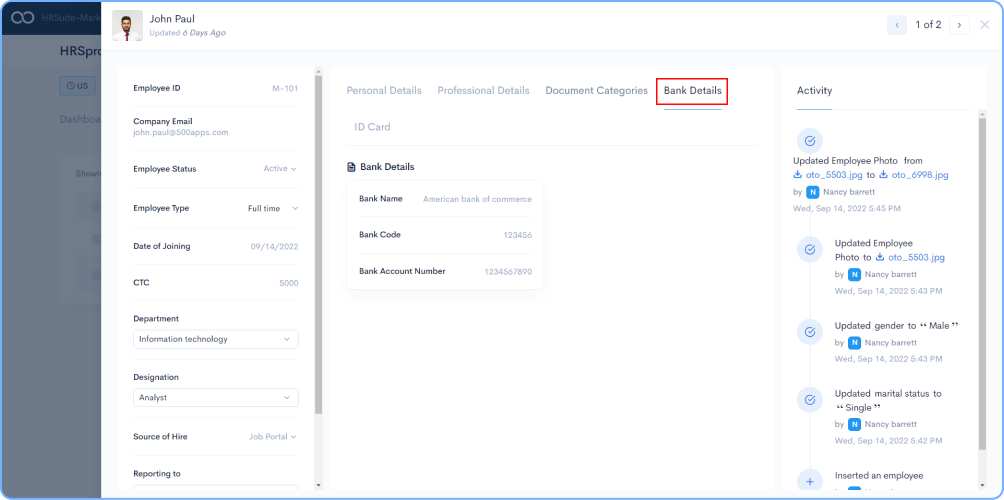
Click on the ID Card tab to view the details on the employee.
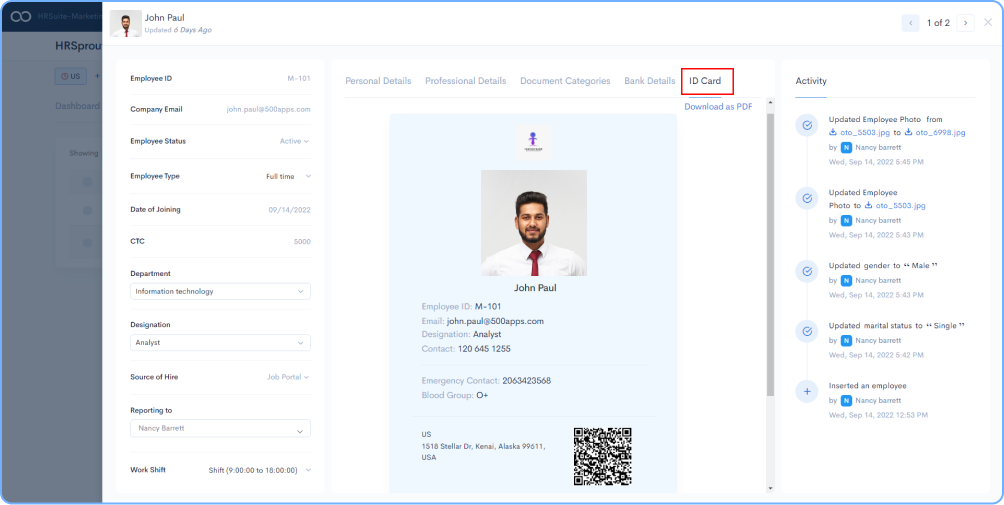
On the RHS, under activity, you can verify all the activities performed by the concerned person for an individual employee.
![]()
On the RHS side you have the Filters option on your dashboard.
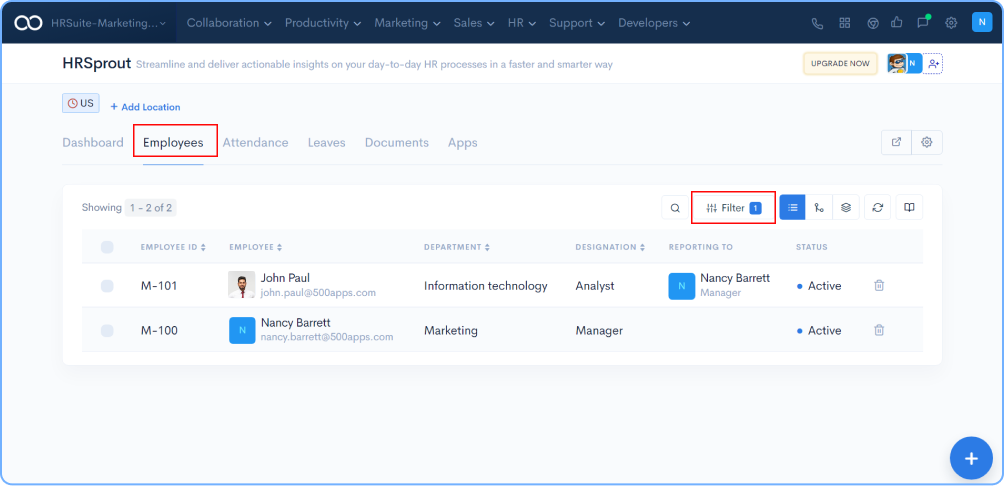
Click on the “Filter” Option, filter as per the requirement.
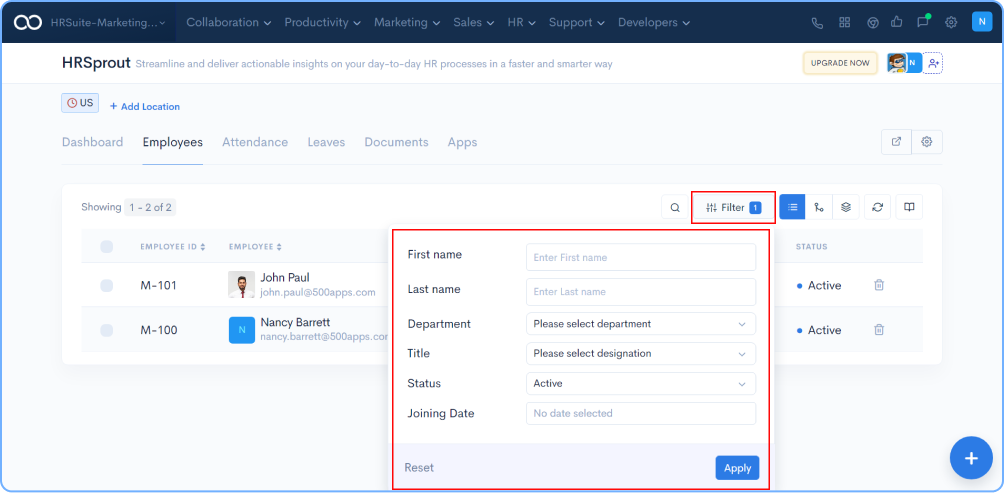
Click on List view icon on the RHS side on the dashboard.
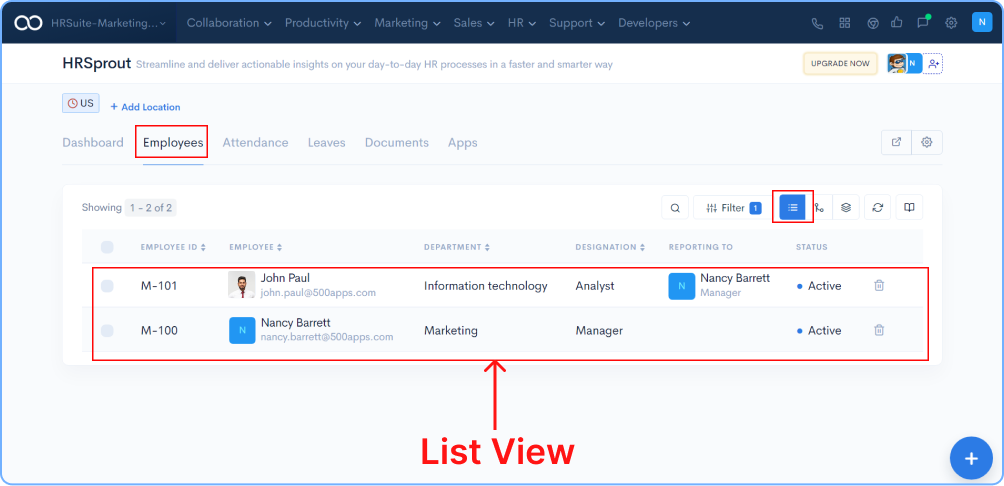
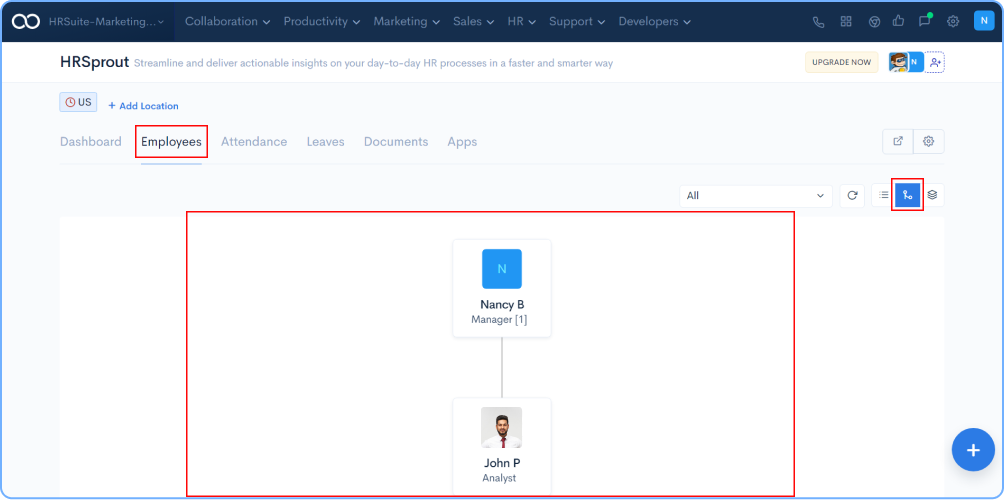
Click on the Hierarchy View icon on the RHS side on the dashboard, as shown in the image below.
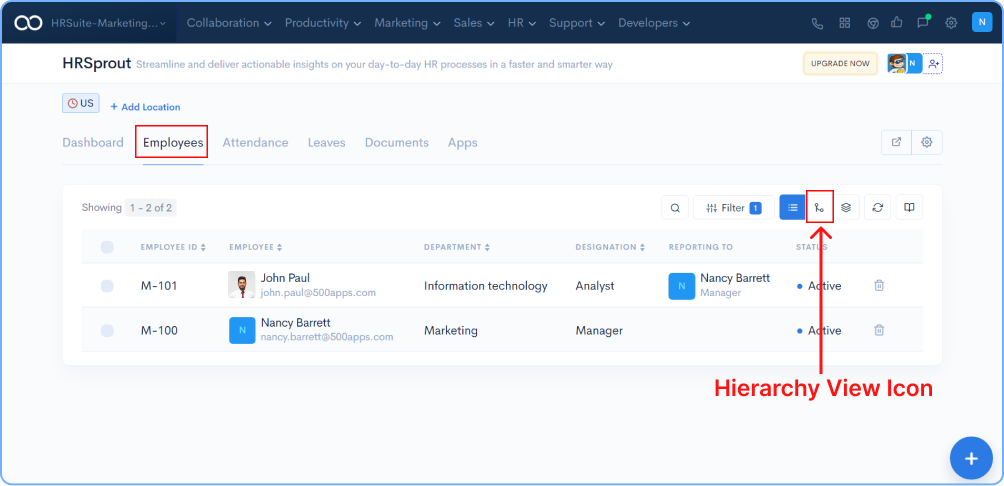
Below is the screenshot of the hierarchy view.
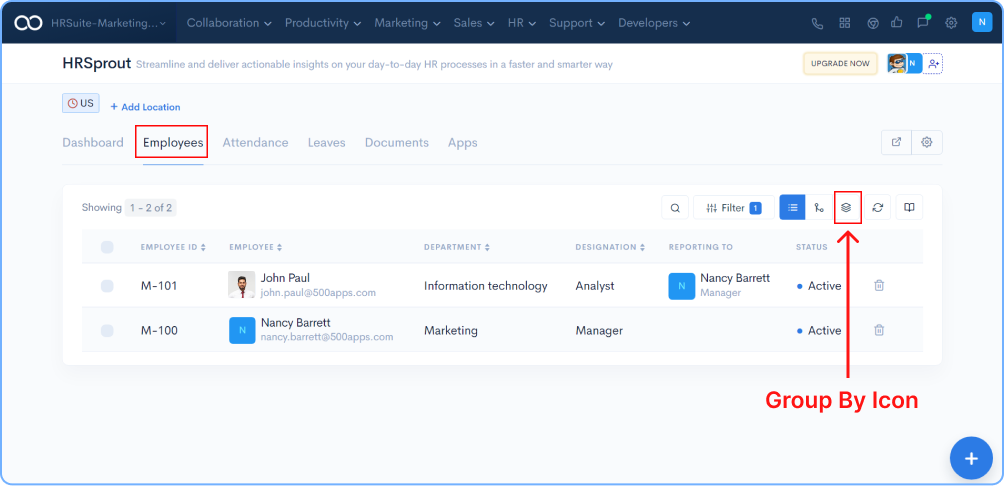
Click on Group By icon on the RHS side of the dashboard, as shown in the image below.
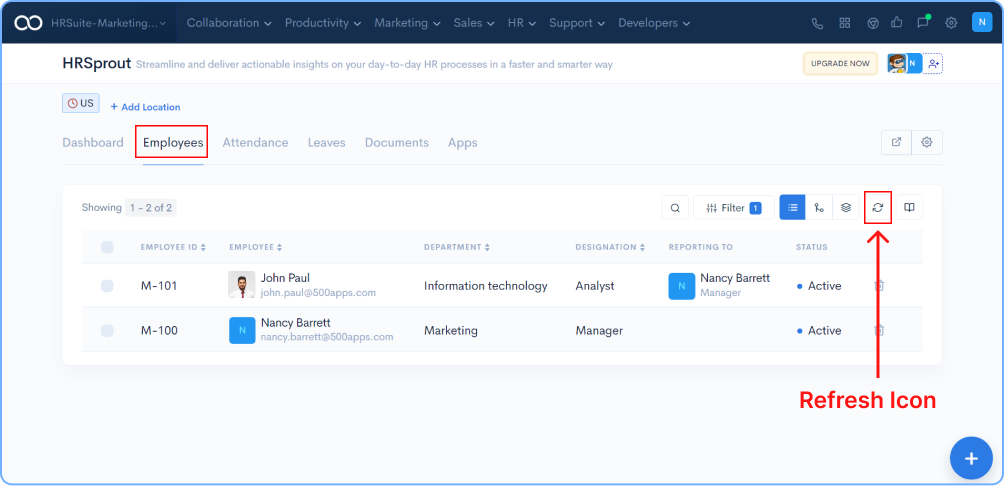
Click on Refresh icon on the RHS side of the dashboard, as shown in the image below.
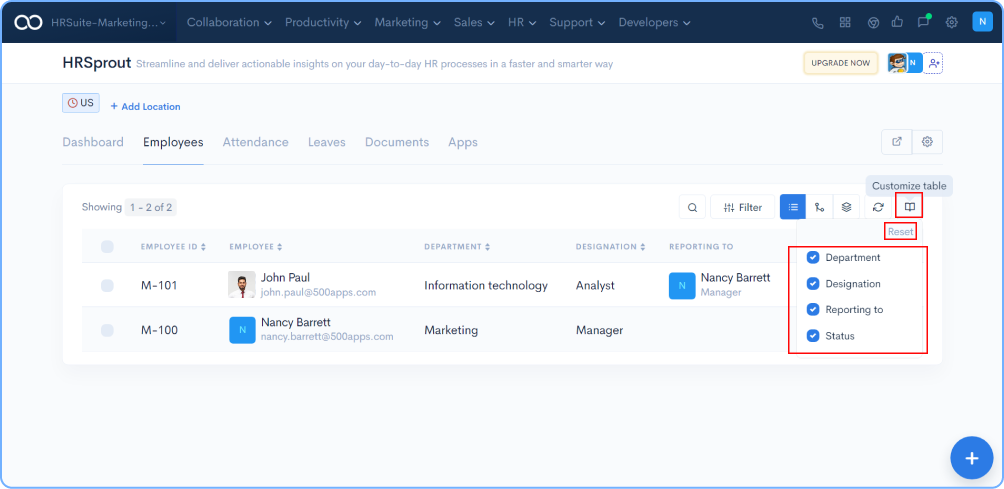
Click on the Customize Table icon on the RHS side on the dashboard, as shown in the image below.
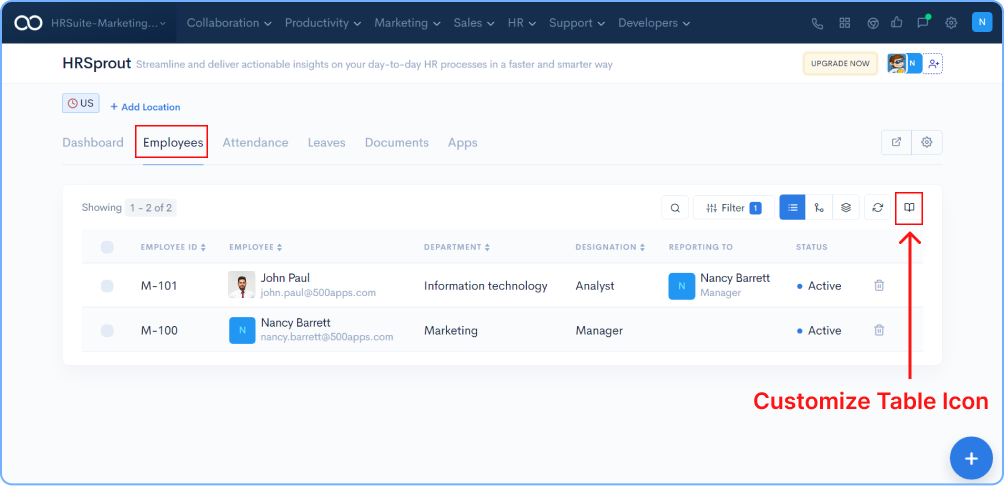
Below is the screenshot of the Customize Table view. Uncheck the options to modify the view of the dashboard table.
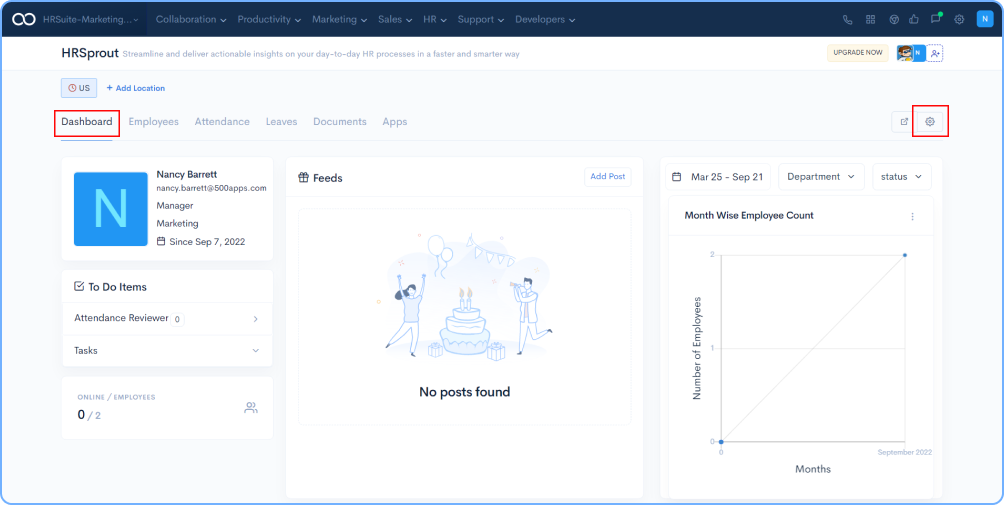
On the RHS you will find an icon as shown in the image below.
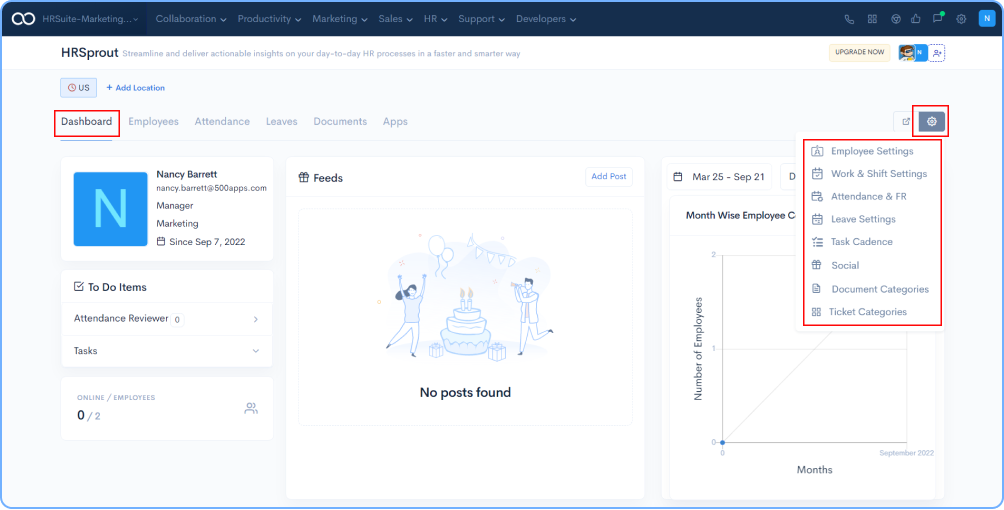
Click on the Icon, a drop down list will preview with multiple options.
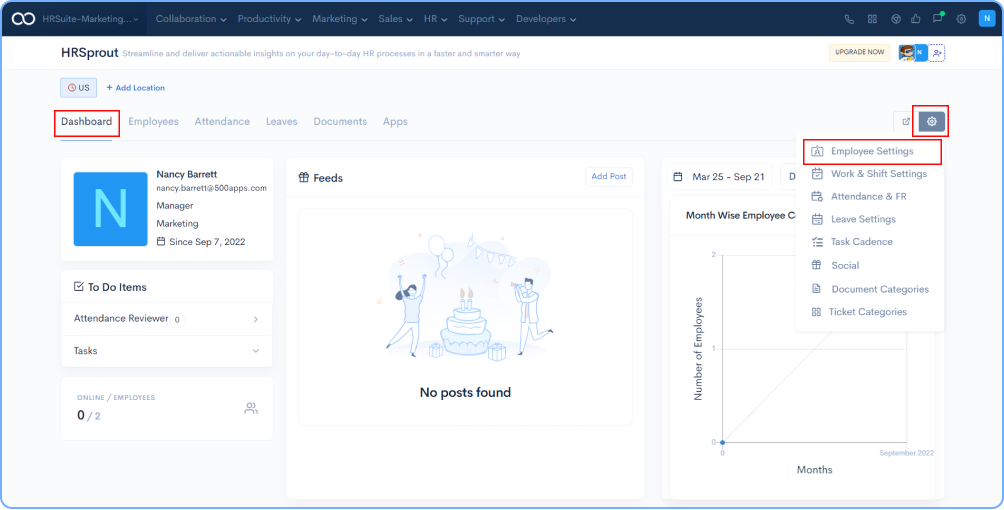
Select Employee Settings from the drop down menu.
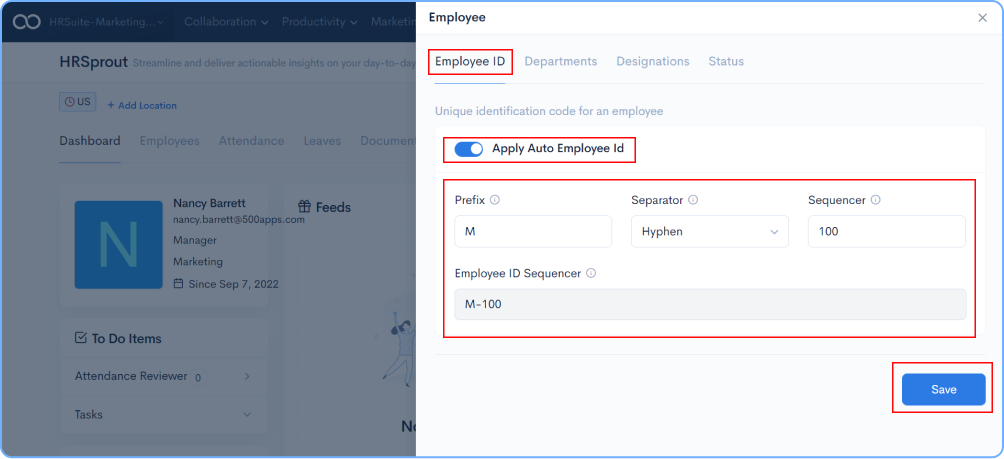
On your RHS, a popup will appear, providing the required details, these will be the default details for all employees. Additionally, you can enable auto employee id, which will assign employee ids to newly added employees automatically.
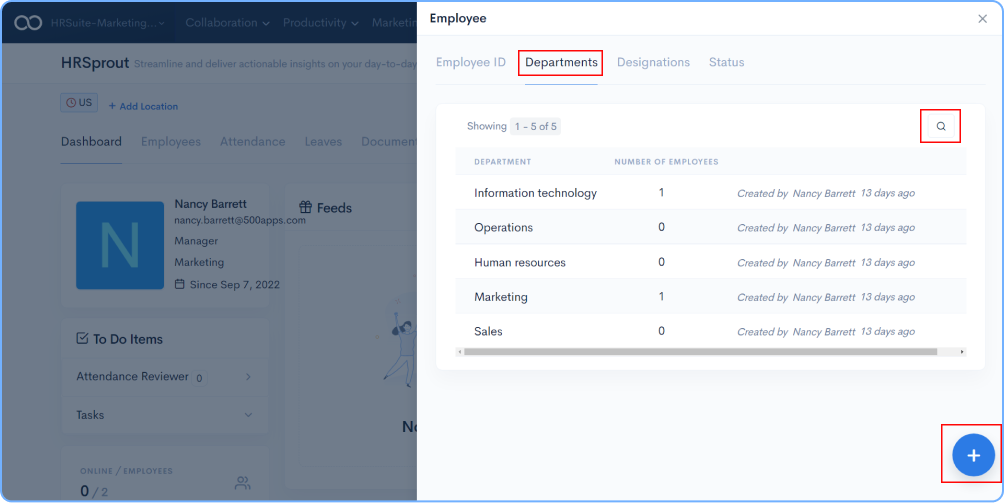
The popup window allows you to see all departments created in your location and to add new departments by clicking on "+" in the right corner. For your convenience, there is also a search option.
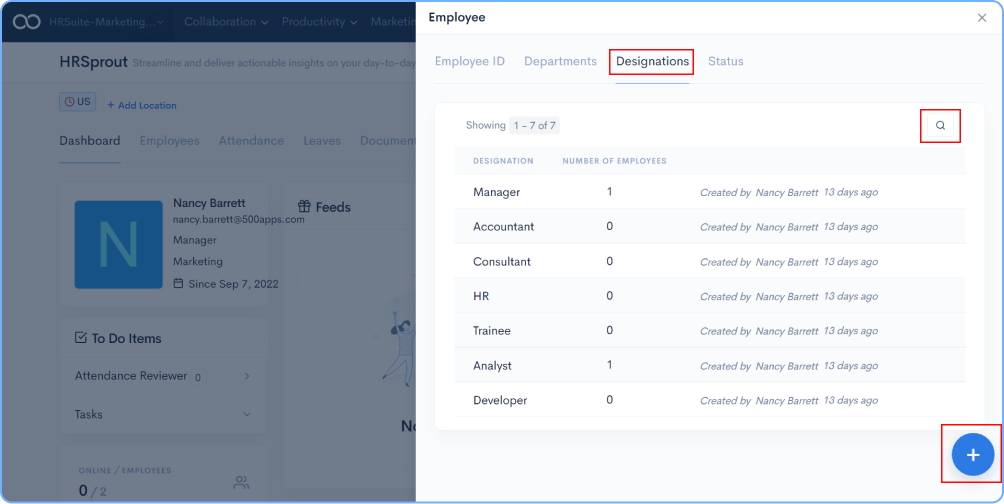
The popup window allows you to see all designations in your location and to add new designations by clicking on + in the right corner. For your convenience, there is also a search option.
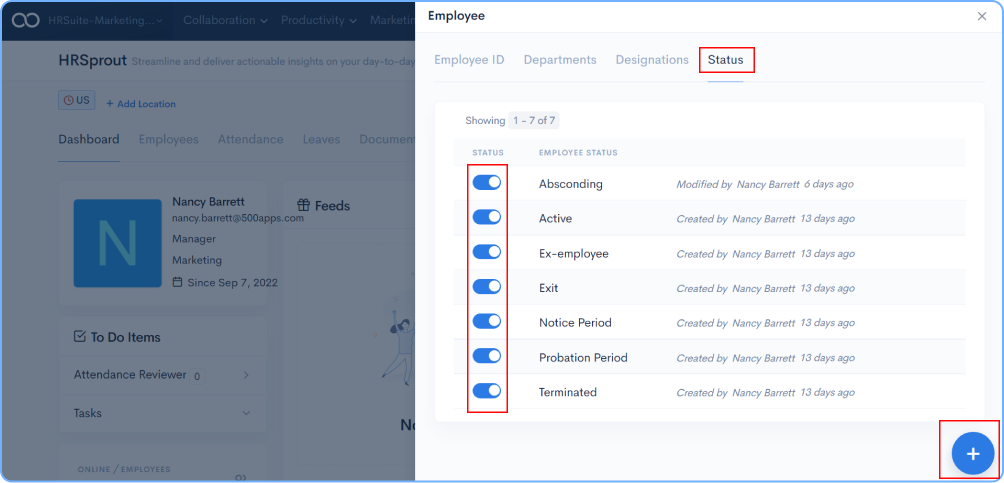
You can see the current status of employees here, and you can also enable or disable the status tag based on your needs, and you can also add new tags by clicking on the + icon in the lower right corner.
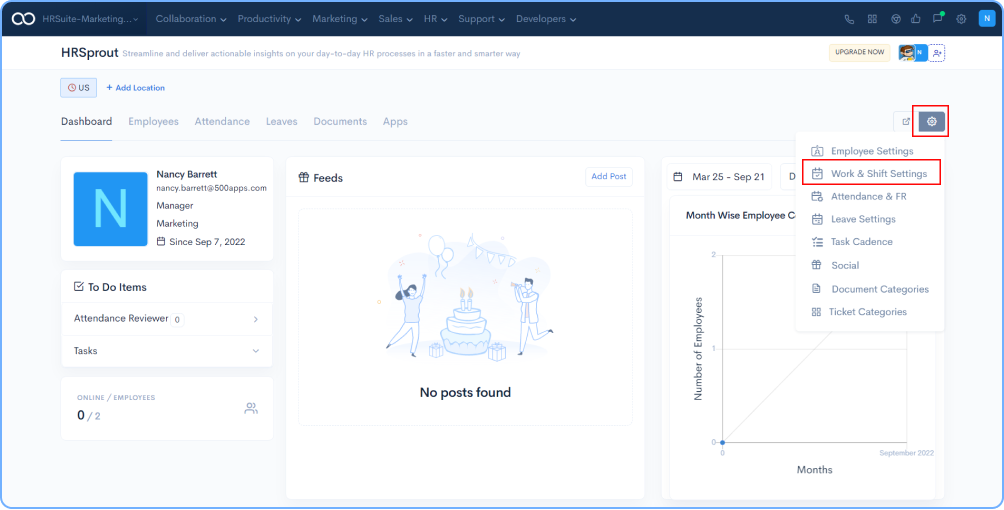
On the RHS you will find an icon as shown in the image below.

Click on the Settings Icon, a drop down list with multiple options.
![]()
Select Work & Shift Settings from the drop down menu.
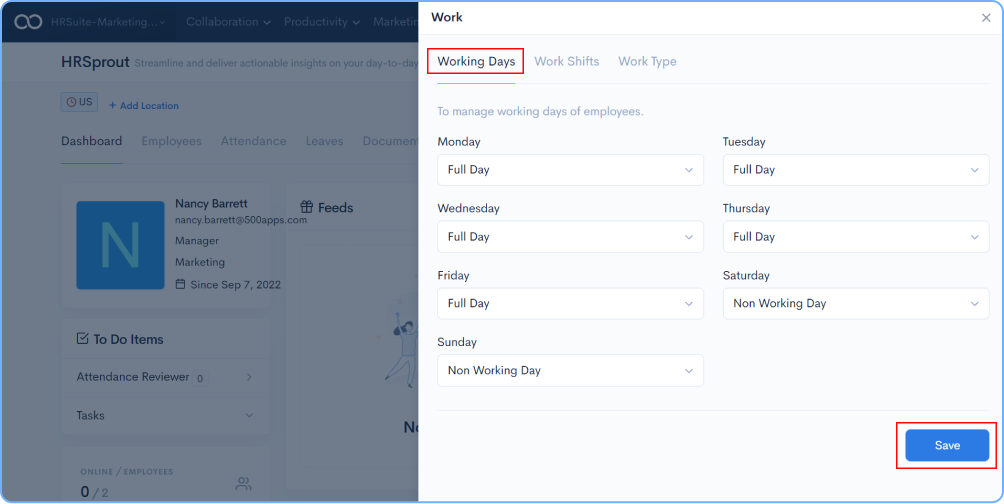
Choose Work Days and mark the days when the organization works, as well as whether it is a full day or half-day, and click Save.
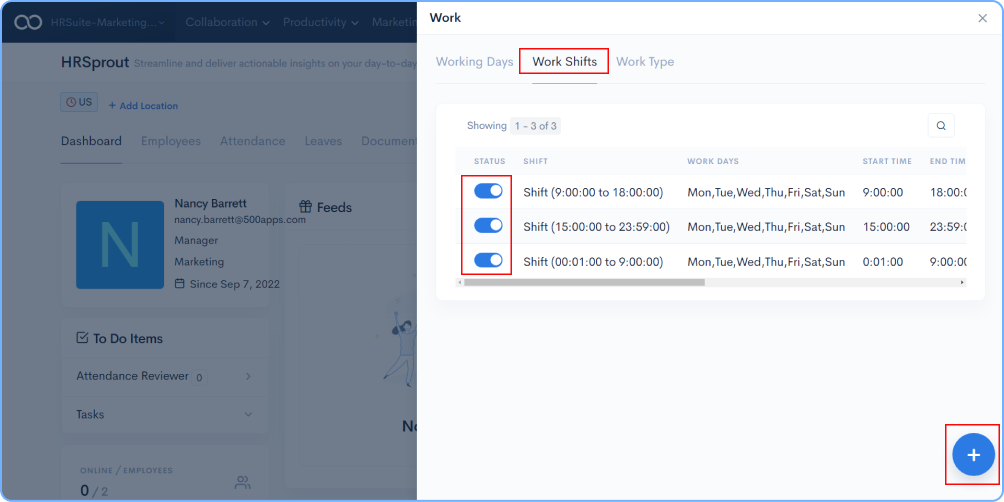
Click the + icon in the lower right corner to create your preferred work shifts. You can also enable and disable created work shifts based on your requirements.
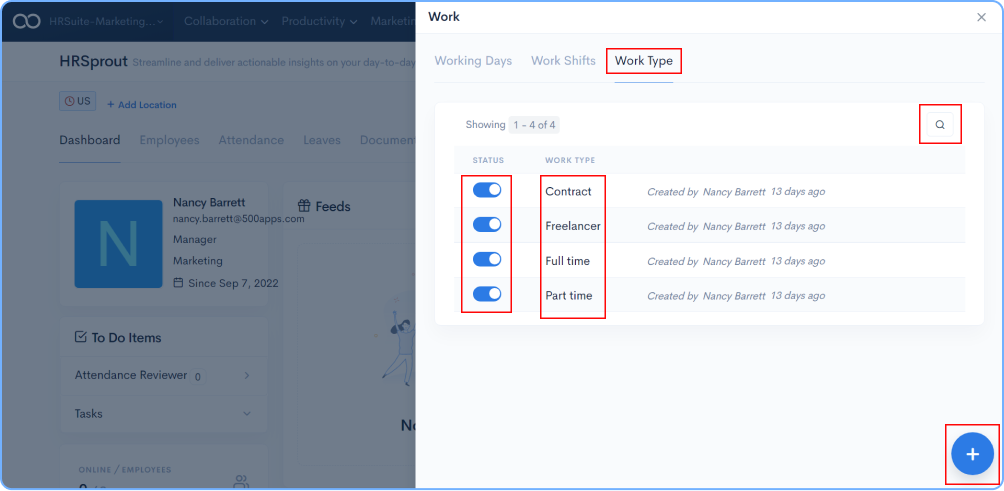
Click on Work Type, click + icon in the lower right corner and add your work type available in the organization. You can enable or disable the work types based on the requirements. For your convenience, there is also a search option.
Click on the Settings Icon, a drop down list will preview with multiple options.
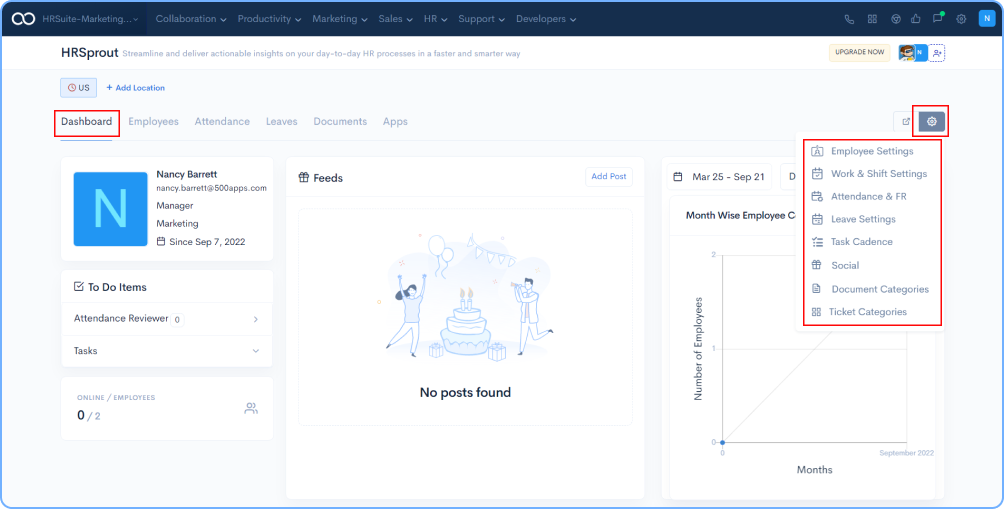
Select Attendance & FR from the drop down and click on it.
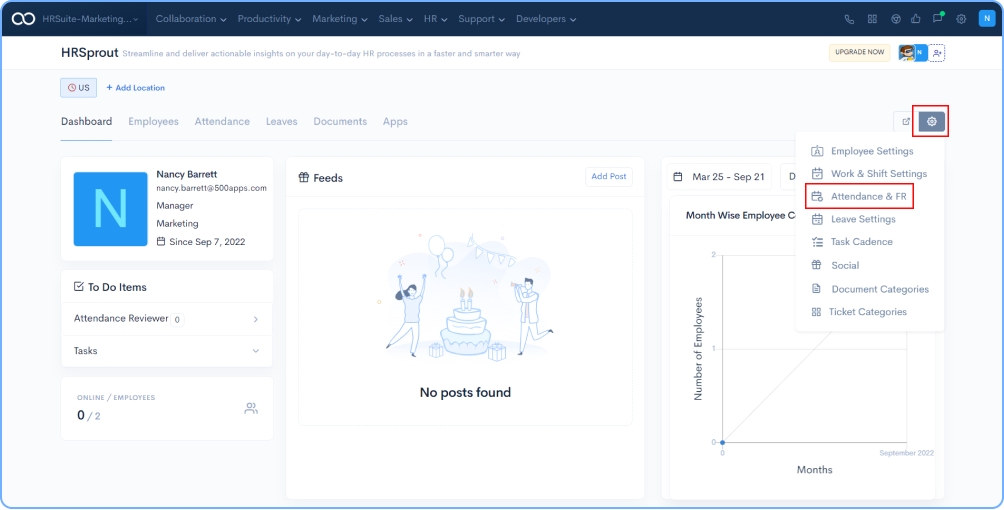
Configure attendance settings for work from home employees. You can enable Clockly time tracking application to monitor your remote employees for productivity.
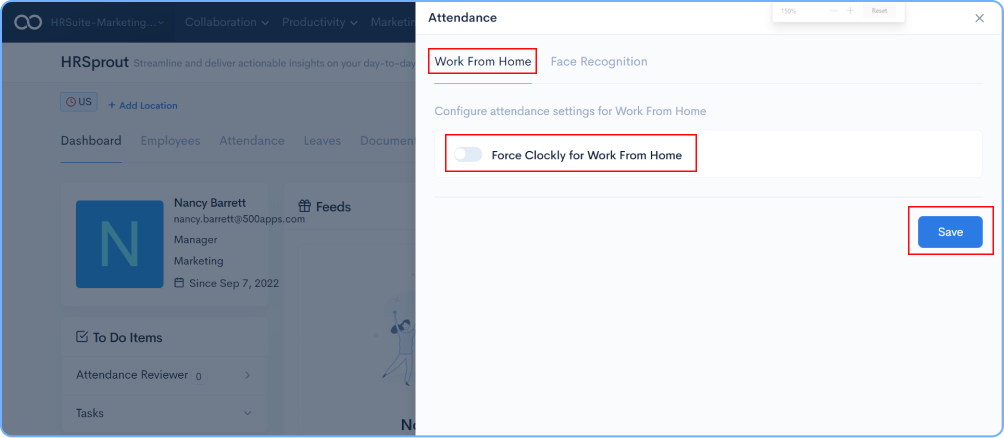
Toggle to Face Recognition select Basic start updating the Company logo, Banner Message, Face Recognition Screen, Messages, Show details and click on Save button.
Note: The above mentioned details will be displayed on FR Screen while employees login and logout.

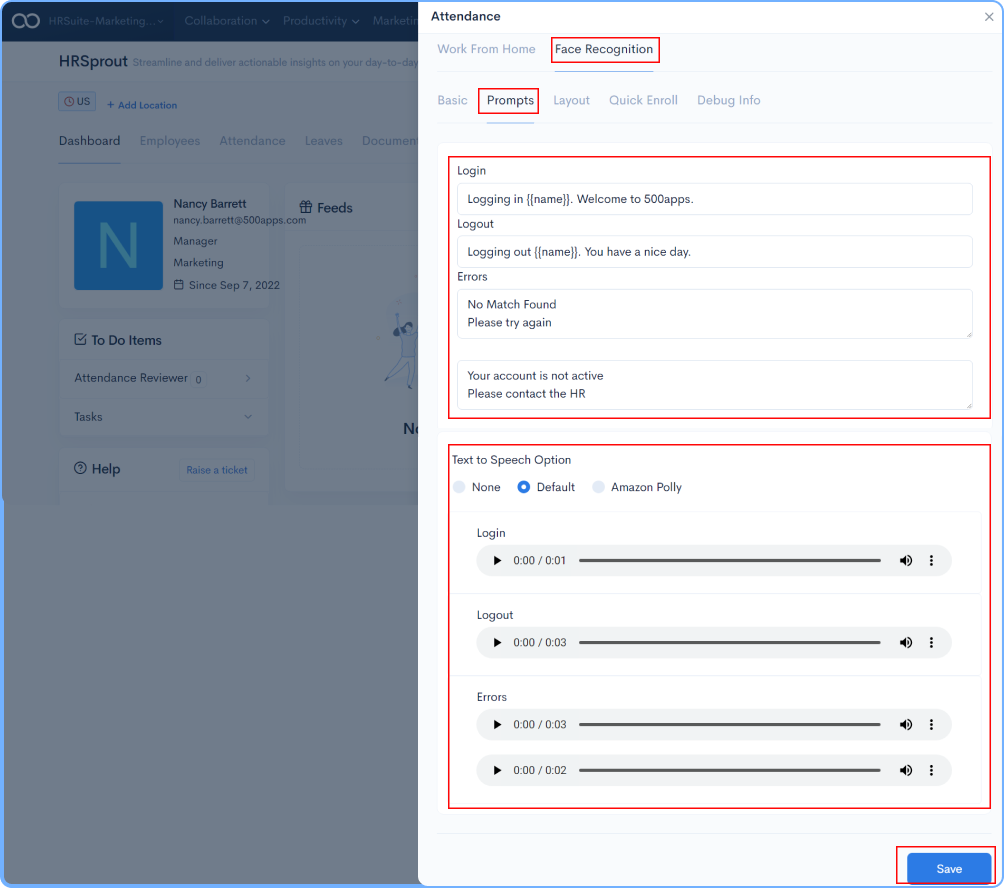
Click on Prompts and enter the login, logout, and error messages that must appear on the FR screen while employees login and logout. For the commands, you can also add text-to-speech.
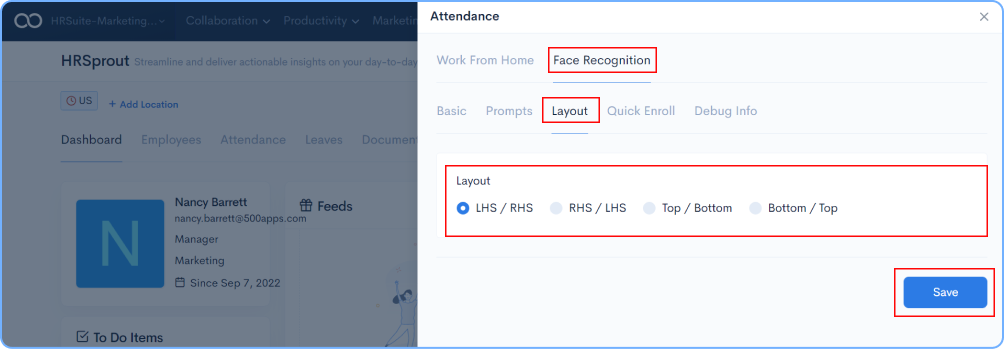
Select the Layout settings for the FR device.
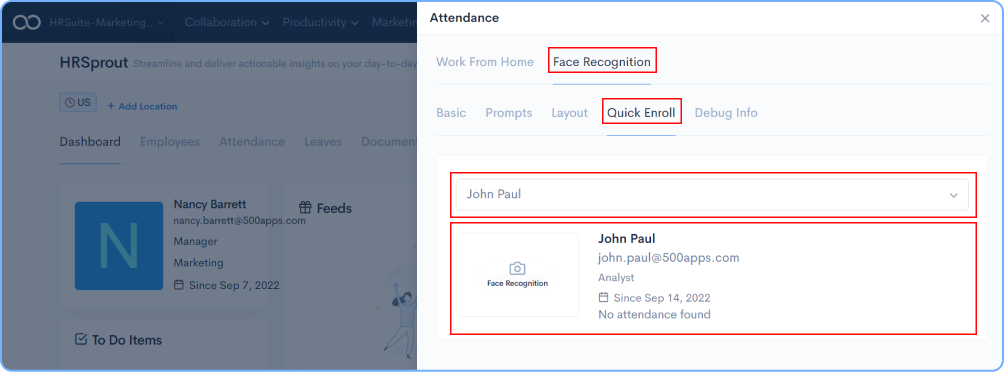
By selecting the employee's name from the drop-down list, you can quickly add Face Recognition for employees.
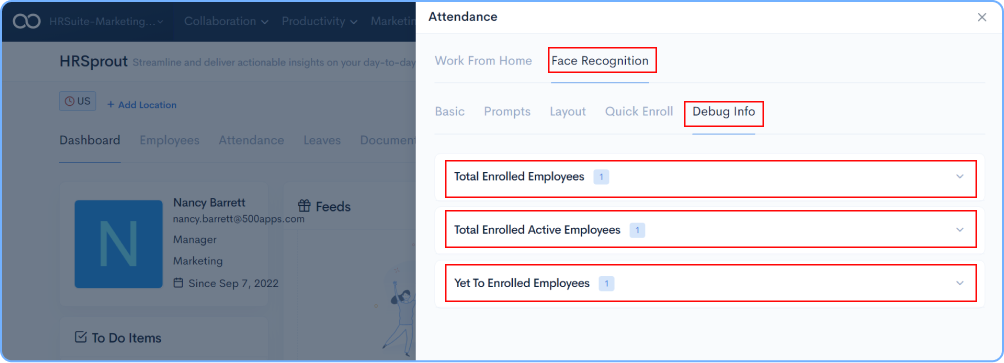
You will have a view of Total Enrolled Employees, Total Enrolled Active Employees, Yet To Enrolled Employees
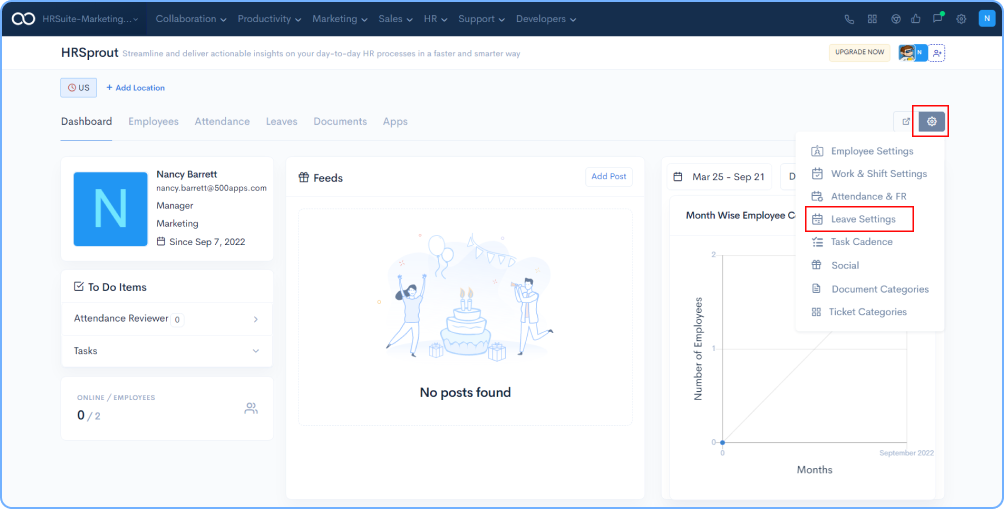
Click on the Settings Icon, a drop down list will preview with multiple options. Select Leave Settings from the list.
Click on the Leave Policy followed by click on + icon in the lower right corner to add a leave policy.

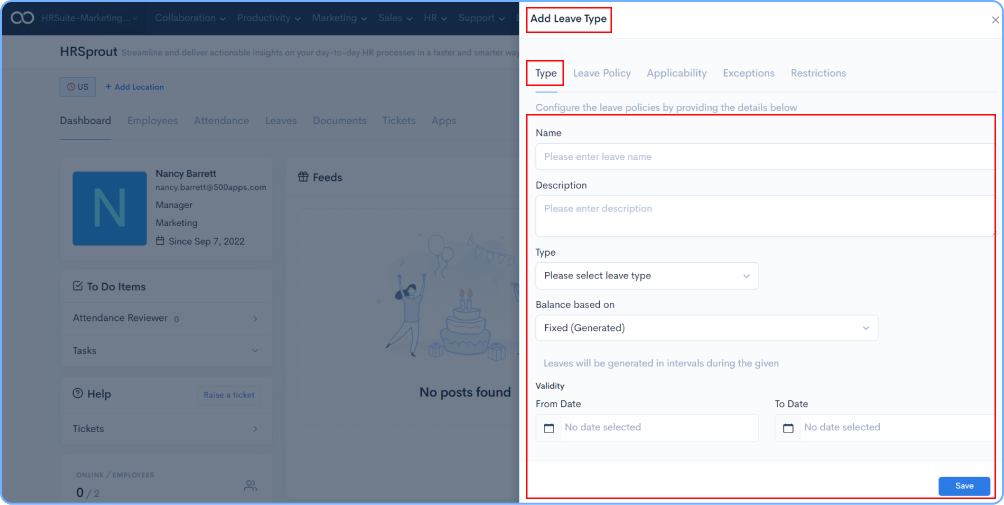
Name the Leave, add Description, select the leave type from the drop down menu as Paid, Unpaid, Onduty, Restricted Holiday. Next select balance leaves form the drop down menu as fixed ( generated) or Grant, followed by validity date and click on save button.
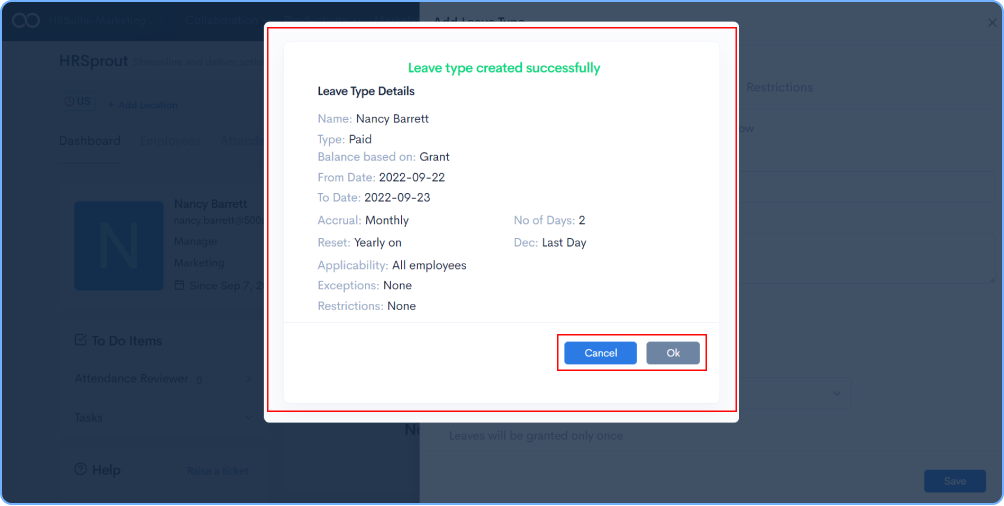
After you click on Save button, a popup will open displaying the Leave Type Details click on the Ok button to continue.
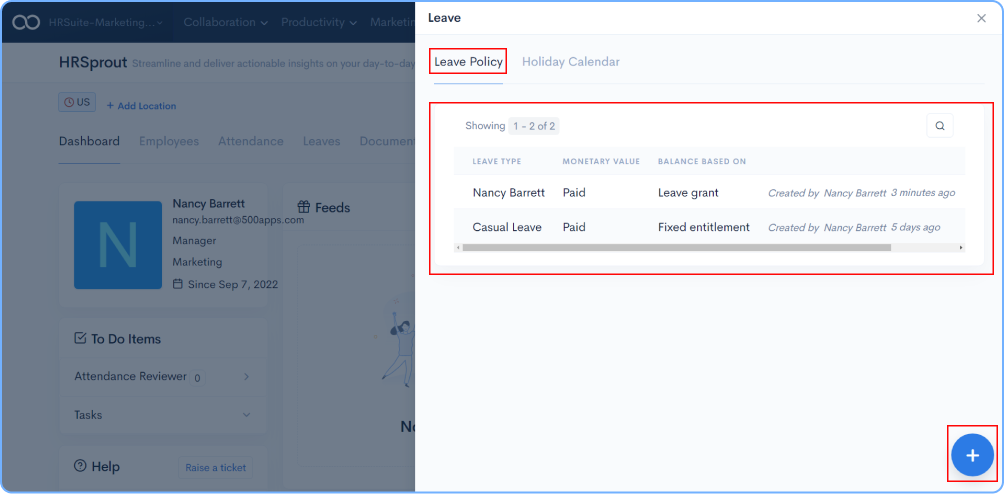
Once the Leave type is created, you can see it on the dashboard.
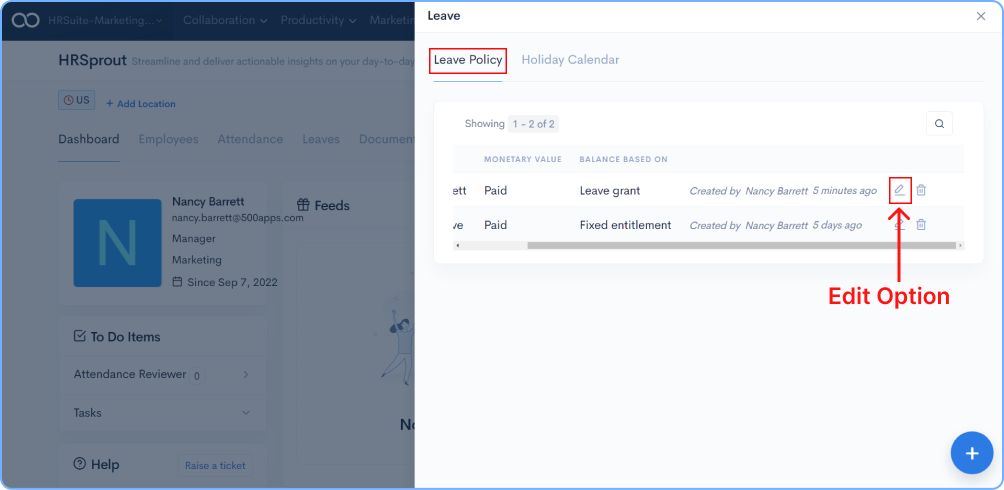
Click on the Edit option.
Configure multiple leave policies to generate leaves.

Select to whom the leave is applicable to. Note: The leave is applicable to all employees by default.
Click on Advance Options for more specific details and fill the required fields and click on the Save button.
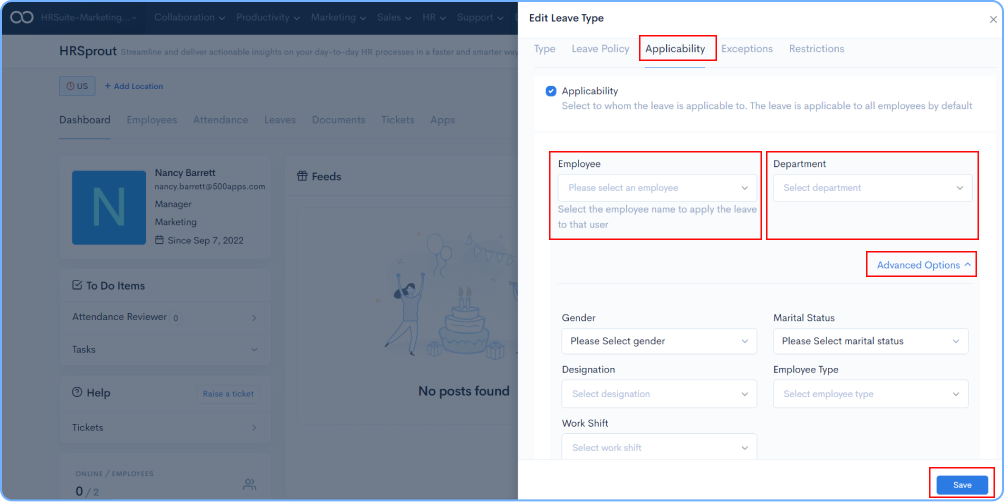
Select the exceptions to exclude the employee based on the criteria.

The leave restrictions should be applied according to the leave policies of the company
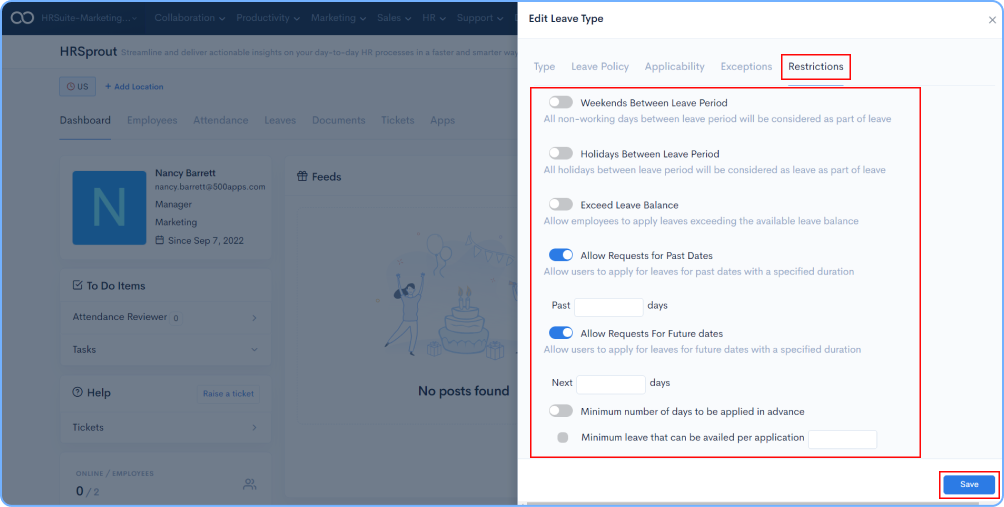
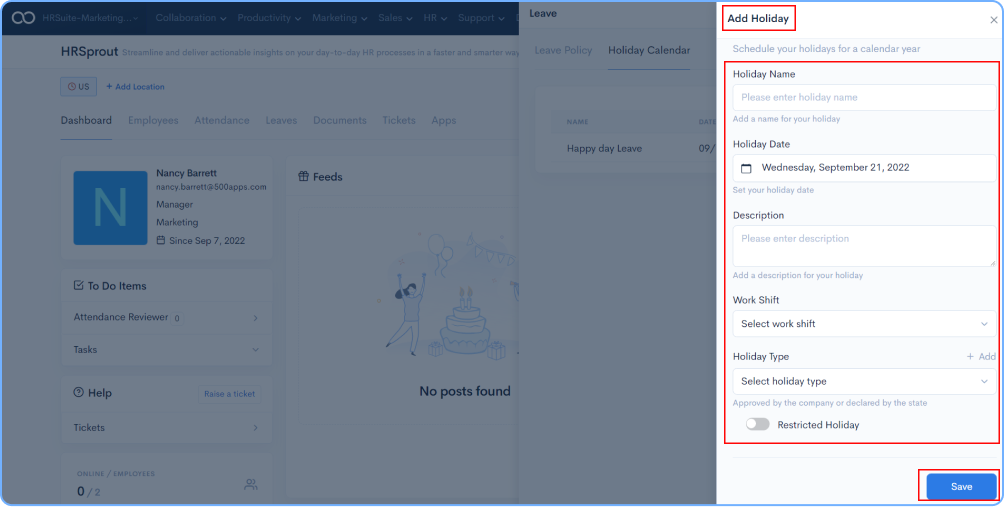
Click on the + icon to add a leave calendar.

Add Holiday name followed by date, description, shift and holiday type. Note: You can enable restricted leave as well as per requirement.
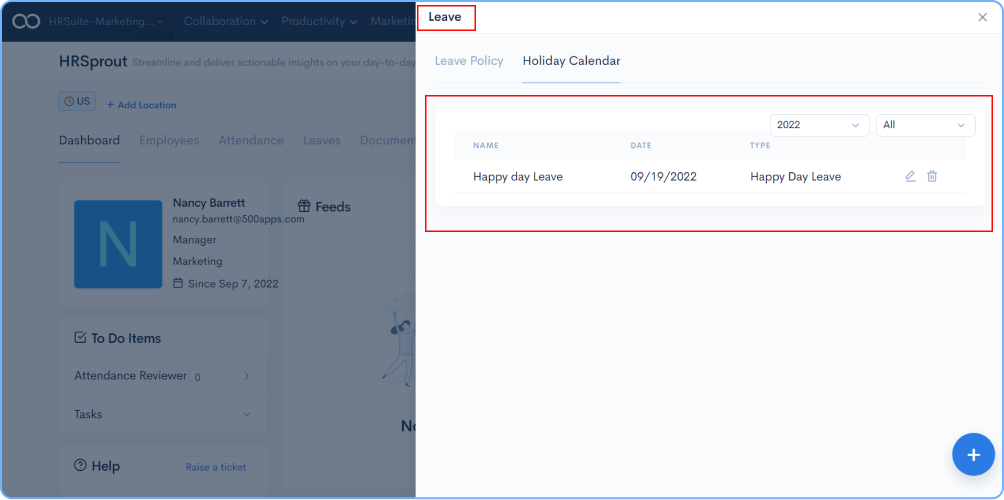
You can see the Holiday on the dashboard once it has been created.
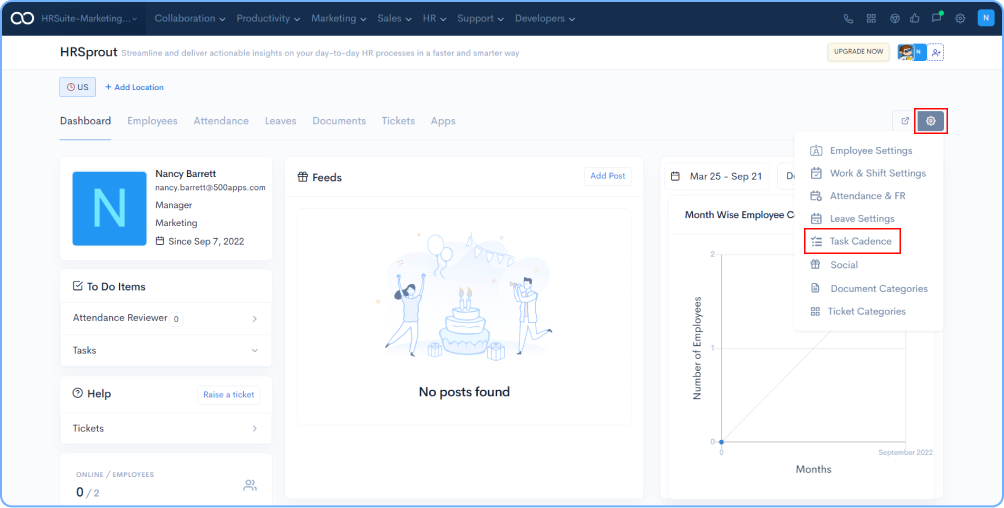
Click on the settings icon and select Task Cadence.
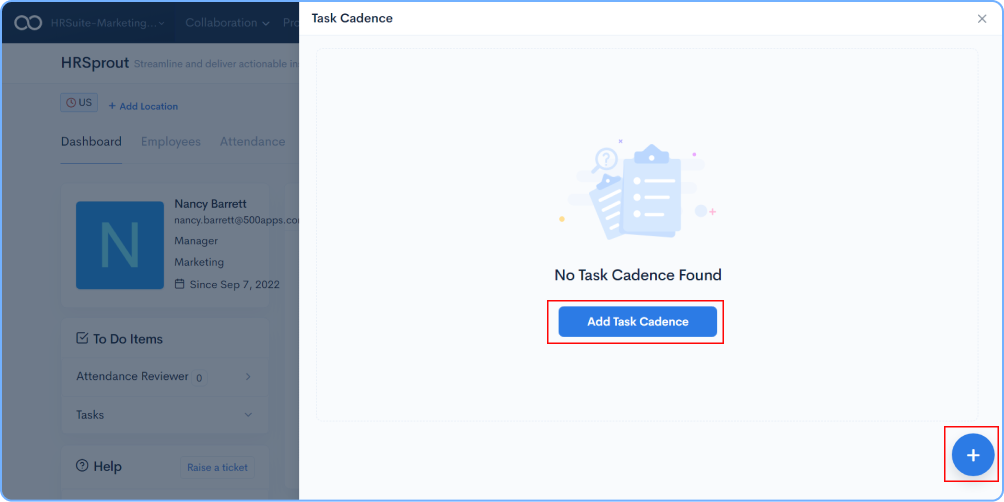
Click on the Add Task Cadence or + icon to add task cadence.
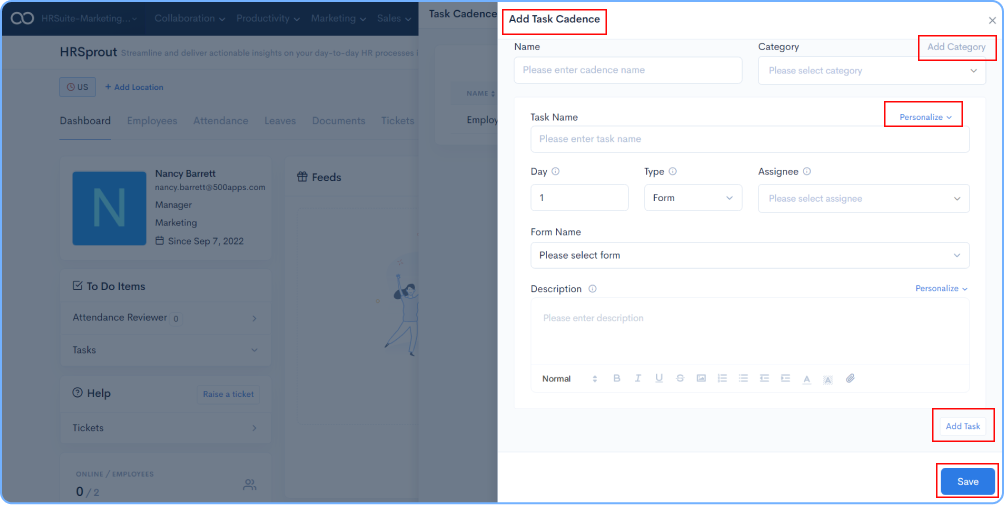
Enter the Cadance details, you can select from the default category or add a new category as per requirements.
You can also personalize your Task Name by adding First Name,Last Name, Designation, Company Email, and Department Name.
You can also add custom task by clicking on Add Task
Dashboard View of Task Cadance

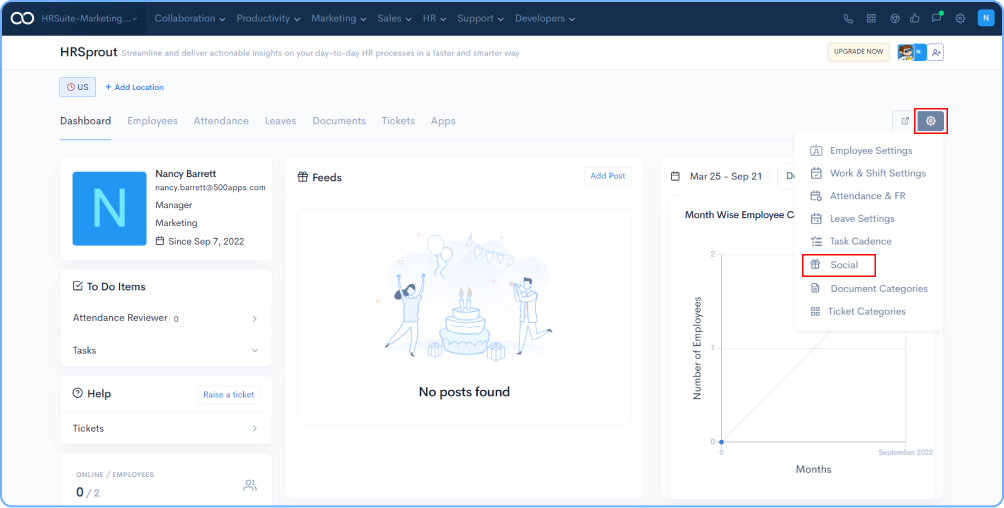
Click on the Settings icon and navigate to Social.
Click on the + icon to add social streams.

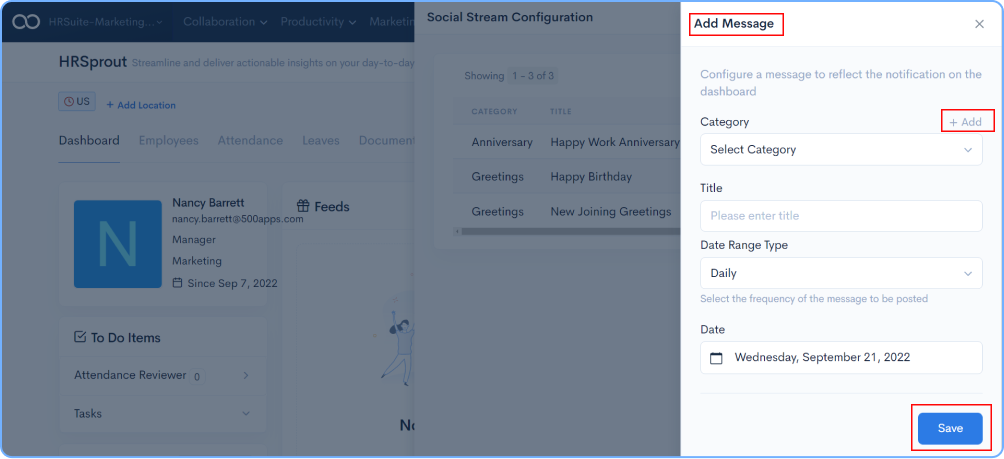
Click on + to add a category, Give it a name, followed by selecting the range type and date. Click on the Save button.
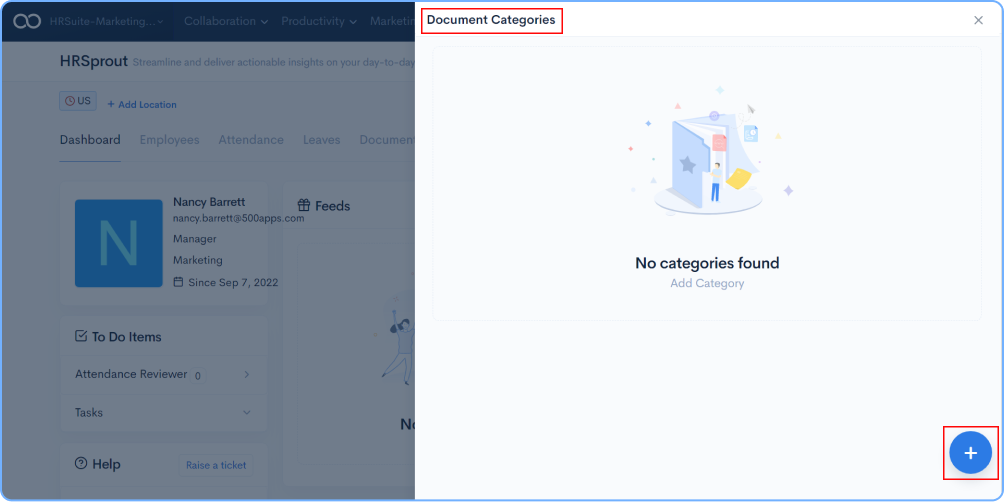
Click on the settings icon and select Document Categories.

Click on the + icon to Add Categories
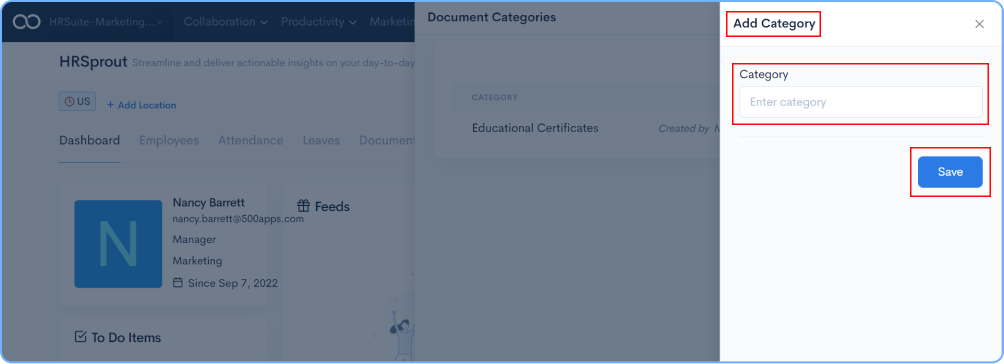
Enter the Category Name as per the requirement and click on the Save button.
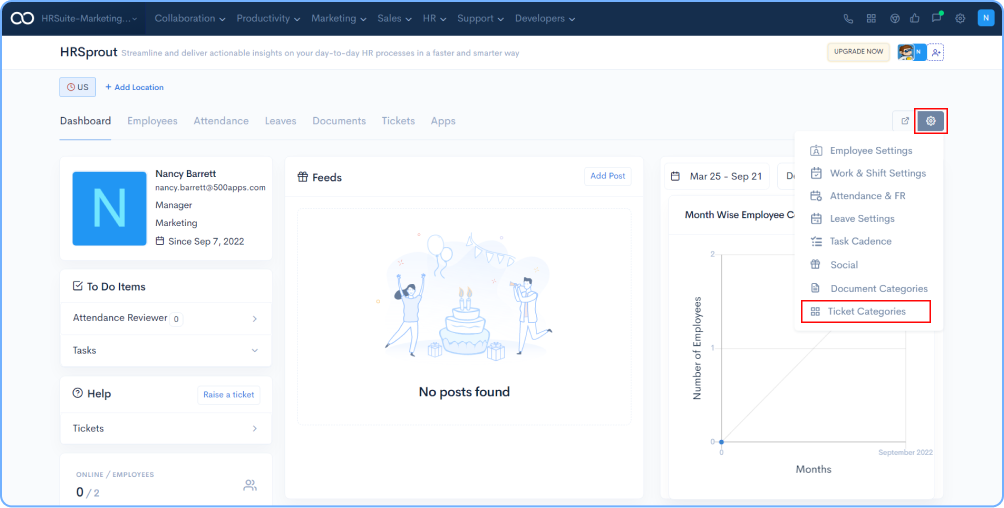
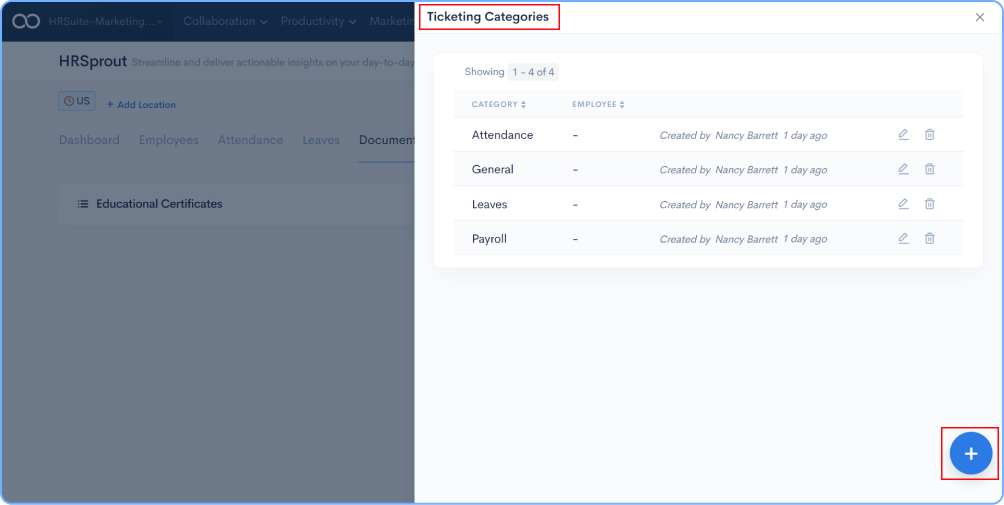
Click on the settings icon and select Ticketing Categories.
Click on the + icon, to add ticketing categories.
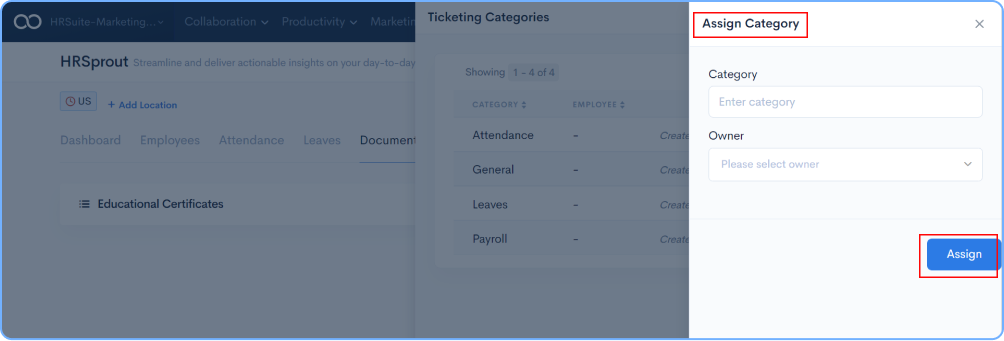
Enter the category name, followed by the owner to be assigned for ticketing and click on the Assign button.
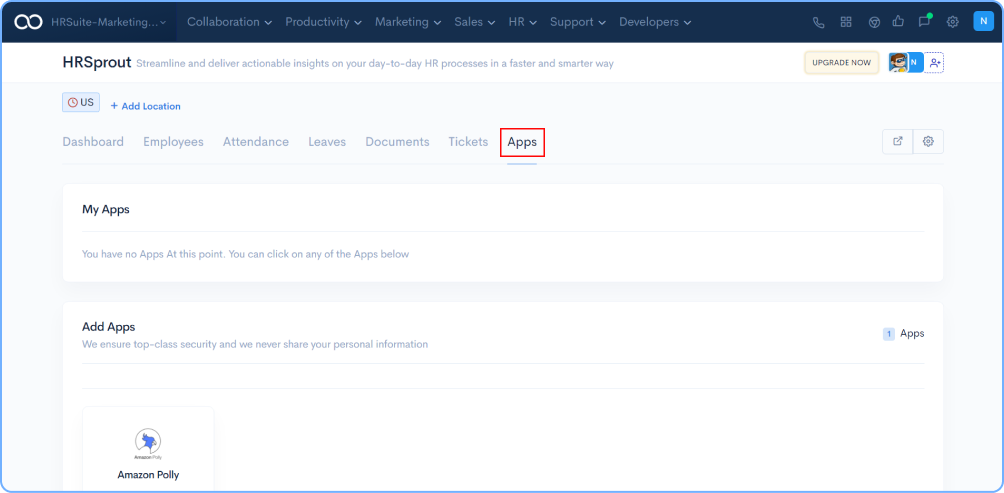
Click on the Apps tab on the dashboard.
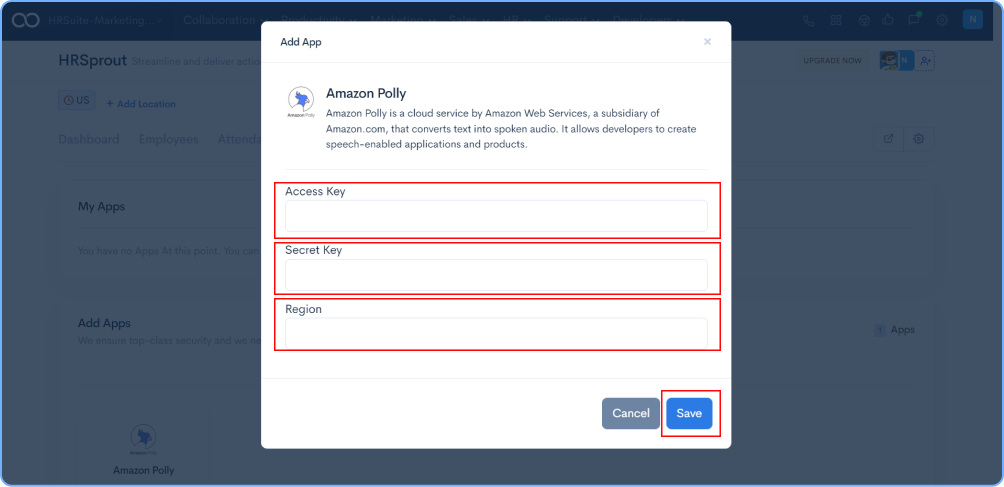
Click on the Amazon Polly application.

Enter the Access Key followed by Secret Key and Region. Click on the Save button.
Click on the Prompts and enter the login, logout, and error messages that must appear on the FR screen while employees login and logout. For the commands, you can also add text-to-speech.

Select the Layout settings for the FR device.

By selecting the employee's name from the drop-down list, you can quickly add Face Recognition for employees.

You will have a view of Total Enrolled Employees, Total Enrolled Active Employees, Yet To Enrolled Employees

Click on the Settings Icon, a drop down list will preview with multiple options. Select Leave Settings from the list.

Click on the Leave Policy followed by click on + icon in the lower right corner to add leave policy.

Name the Leave, add Description, select the leave type from the drop down menu as Paid, Unpaid, Onduty, Restricted Holiday. Next select balance leaves form the drop down menu as fixed ( generated) or Grant, followed by validity date and click on save button.

After you click on Save button, a popup will open displaying the Leave Type Details click on Ok button to continue.

Once the Leave type is created, you can see it on the dashboard.

Click on the Edit option.

Configure multiple leave policies to generate leaves.

Select to whom the leave is applicable to. Note: The leave is applicable to all employees by default.
Click on Advance options for more specific details and fill the required fields and click on Save button.

Select the exceptions to exclude tye employee based on the criteria.

The leave restrictions should be applied according to the leave policies of the company

Click on “+” icon to add leave calendar.

Add Holiday name followed by date, description, shift and holiday type. Note: You can enable restricted leave as well as per requirement.

You can see the Holiday on the dashboard once it has been created.

Click on the settings icon and select Task Cadence.

Click on the Add Task Cadence or + icon to add task cadence.

Enter the Cadance details, you can select from the default category or add a new category as per requirements.
You can also personalize your Task Name by adding First Name,Last Name, Designation, Company Email, and Department Name.
You can also add custom task by clicking on Add Task

Dashboard View of Task Cadance

Click on the Settings icon and navigate Social.

Click on the + icon to add social streams.

Click on + to add a category, Give it a name, followed by selecting the range type and date. Click on the Save button.

Click on the settings icon and select Document Categories.

Click on the + icon to Add Categories

Enter the Category Name as per the requirement and click on Save button.

Click on the settings icon and select Ticketing Categories.

Click on the + icon, to add ticketing categories.

Enter the category name, followed by the owner to be assigned for ticketing and click on Assign button.

Click on the Apps tab on the dashboard.

Click on the Amazon Polly application.

Enter the Access Key followed by Secret Key and Region. Click on the Save button.
